
Previously, I posted a tutorial explaining how to create a WordPress staging site with cPanel. This is the follow-up tutorial that explains how to move a WordPress staging site to live using cPanel. Once all changes to the staging site are complete, you are ready for the migration process.
Part 1: Backup staging and live site
- Access cPanel > File Manager > [staging site folder].
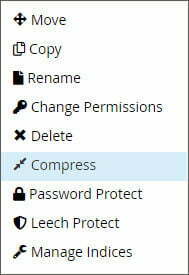
- Highlight everything inside the folder > Right-click on any of the folders and click Compress.
- Compress means to package files and folders into a single archive file.
- A prompt box will appear. Give the compressed archive a name that is easy to reference. For this tutorial, the backup archive is named ‘staging-site-backup.zip’. If you are unsure which compression to choose, use ‘zip’.

- Right click on the compressed archive file > Download (so you have a copy on your computer’s local drive).
- Repeat the same process for the live site folder (typically in the ‘public_html’ folder).
Part 2: Backup staging and live site database
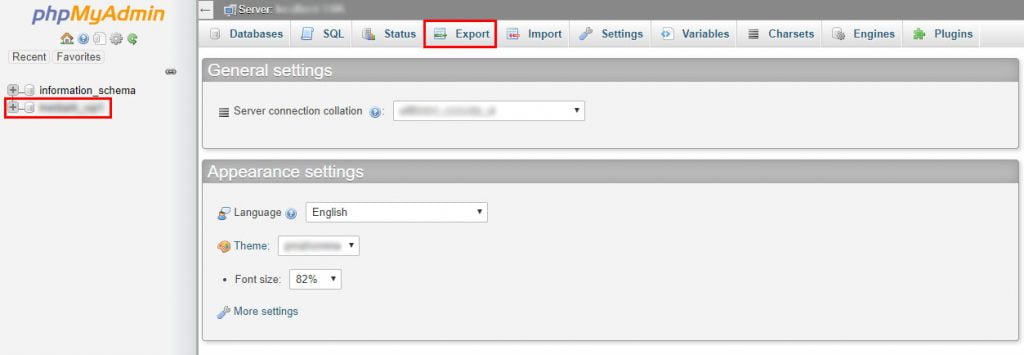
- Access cPanel > phpMyAdmin.
- On the left navigation bar, navigate to the staging site database.
- In the main panel, click Export.
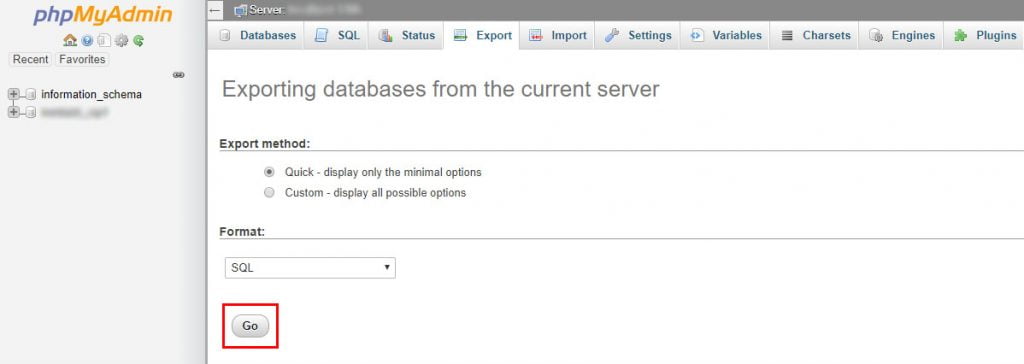
- Choose Quick export method > SQL format > Go (this will download the database onto your computer’s local drive.
- Repeat the same process for the live site database.
Part 3: The migration process
- Access cPanel > File Manager > navigate to public_html folder.
- Create a folder called ‘old’. Highlight everything in public_html folder (except for old folder), then move to old folder.
- Navigate to the staging site folder, then move all files and folders to public_html folder.
- Go back to cPanel Home > phpMyAdmin
- Navigate to the staging site database > go to the ‘Options’ table and update the option values of ‘siteurl’ and ‘home’ to the correct URL. For example, from dev.alexthedigitalproducer.com to alexthedigitalproducer.com
- Open a new page on your web browser and type in your domain name and access WordPress backend (e.g. [domain name/wp-admin]) > Update Permalinks.
- Check the entire website for broken links. If you have too many links to check, there are plugins available for your convenience.
Part 4: Clean up (optional)
If the website is operating as it should go to cPanel to clean up redundant files:
- Delete the previous version of the website in File Manager.
- Delete redundant database.
- Delete subdomain.
Tutorial complete
That’s the end of the tutorial. If you found this useful, please leave a comment and share this blog. As always, let us know if you have any specific topics that you would like us to cover in the future. Keep up to date with all our latest blog posts here.
Happy migrating!
I had a very hard time trying to find an online tutorial on how to move a staging website to the live website. most of the online information required you to use a paid plugin. I found your tutorial and followed it to the letter. Everything worked perfectly. I appreciate your due diligence in presenting accurate instructions. Thank you…Cg
You are most welcome! 🙂
Amazıng content, Thank you!
YOU’RE A SUPERSTAR – THANK YOU! FLAWLESS… 😀
I completely agree with @CHYRL GRAHAM – “Most of the online information on this topic IS JUST A MARKETING GENERATOR FOR PAID PLUGINS”.
ON THE OTHER HAND, THIS TUTORIAL ACTUALLY TEACHES HOW TO DO THINGS PROPERLY.
Thank you!
Glad we can help the online community 🙂